My original Roubo style workbench
The first bench was an experiment based on a bunch of information I gathered from various sources. The bench turned out really well, but required quite a bit of metalworking tools to build the vises. I needed a metal lathe, milling machine, welder, grinder, and bandsaw.
This page has more information about that bench.
In the ensuing months, I designed some easier to build vises that do not require as much metal work. They still have acme screws that need to have shoulders turned, but, a welder, milling machine, and metal lathe are not required.
Click here for information on the new roubo bench.
For my first roubo, all vise hardware was shop built using acme screws, nuts, 2 bolt flange bearings, hand wheels and other hardware that is easily found. Metalwork was done on a small lathe, milling machine, drill press, bench grinder, and mig welder. Typical woodworking machines were used for most of the rest of the bench.
The bench breaks down into 7 main pieces:
Having the bench break down like this makes it very manageable to build in a one person shop - I had no trouble performing the various operations to build it. For instance, I was able to run each slab through my thickness planer with no help.
The bench breaks down into 7 main pieces:
- 2 top slabs - the front slab will have the wagon vise installed
- 2 end leg assemblies
- 2 long stretchers
- 1 leg vise
Having the bench break down like this makes it very manageable to build in a one person shop - I had no trouble performing the various operations to build it. For instance, I was able to run each slab through my thickness planer with no help.
Metalwork and a dogsled
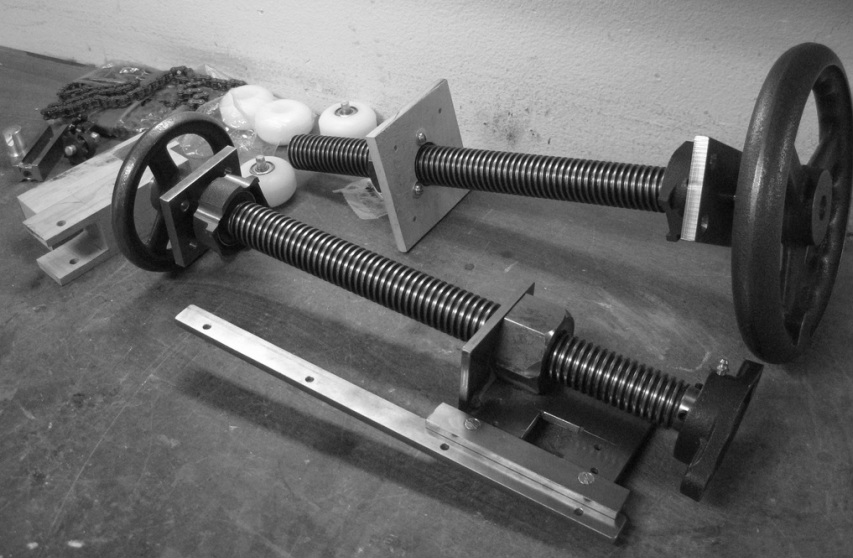
The wagon and leg vise hardware was shop built.
A 36" length of 1 1/4" acme screw was cut in half yielding 18" for each vise. A shoulder was cut on each end of the wagon vise screw and on one end of the leg vise screw for 3/4" flange bearings. Each of the screws got an additional 5/8" shoulder to accept a stop plate and handwheel.
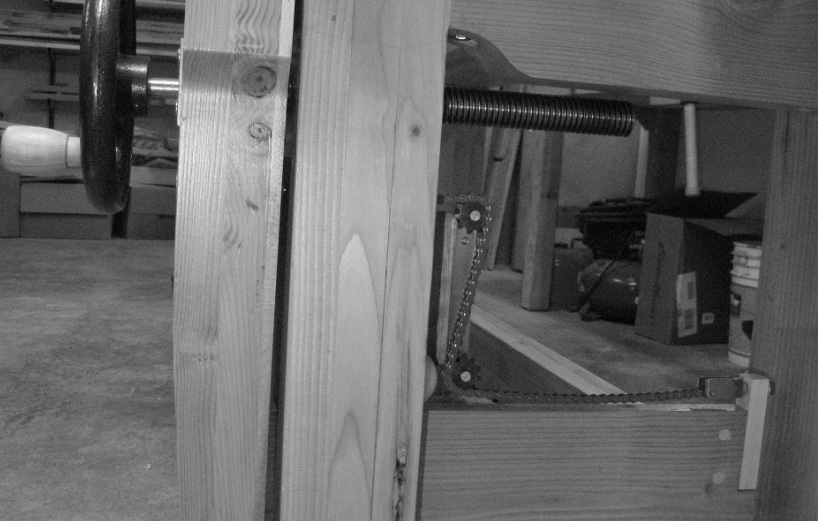
Flange bearings float in mortises on the hand wheel end of the vises. On most wagon vises that have the nut attached to the chop, the far end of the screw is usually unbound. On these vises, the handle does not move in and out with the chop and a rail running along each side of the screw is used to guide the chop to ensure smooth operation. My design also has the nut attached to the chop, but the far end of the screw is trapped in a bearing, which eliminates the need for dual rails. The vise is further simplified by putting the runners on the chop. This design does incorporate a complexity through the use of flange bearings though.
The new designs I'm working on use sealed bearings that you can pick up for a few dollars a piece - to build both vises, you'll need 3 of them.
With the runners being on a chop sled that has a dog hole, I began calling this "the dog sled vise".
I designed a simpler, easier to build version that requires less metal machining and no welding. Click here for details.
Woodwork, an elephant, and a dog leg
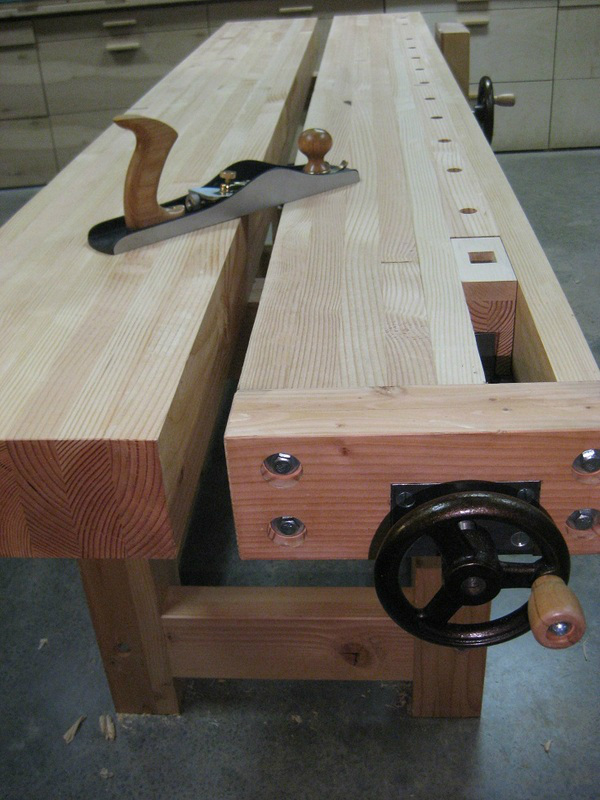
A roubo bench is massive - a fairly large quantity of material is required. This bench requires about 140 board feet of wood. I used 15 - 8' 2x10s.
Dimensions:
Material - Douglas fir dimensional lumber
Hardware - see above plus whatever was in current inventory or locally available.
For the split top, boards were rough cut, thickness was planed to exact size so that the glue ups would yield the required width for each of the 2 slabs. Thin strips were cut based on wagon vise gap requirements to put the dog holes in the center of a 1 1/2" thick board. These strips, along with a 1 1/2" thick board were cut shorter to form the wagon vise gap. Each of the 2 sections were glued up all at once, planed to 4 1/4", then the ends crosscut to clean them up.
Legs were laminated from three 1 1/2" boards and the stretchers from 2 boards. Mortise and tenons were used for all base joints as well as the base to top connection. All required mortises were cut into the leg vise leg prior to glue up of the base end sections. The left and right end leg sections were glued with short upper and lower stretchers. Long stretchers connect the end sections via bed bolts. The top slabs are mortised to sit on leg tenons - four lag bolts through the short upper stretchers into the slabs complete the joint.
The leg vise chop was laminated from 2 doug fir boards with the inside face getting a 1/4" layer of maple. It was planed to get a final width of 3". The wagon chop was made from 2 pieces where the hole was first formed in each half before gluing.
Cavities for the wagon vise hardware were cut and the vise was installed. A 2 1/2" cap was lag bolted onto the end to capture the handwheel end of vise. Dog holes were first plunge routed as deep as my 3/4" bit would go, then finished with an auger bit.
It was mentioned after the bench was complete, I could stand on it :~ pretty sure this bench could support an elephant though...
And since it has a dog sled vise, I suppose a dog leg vise would go with it nicely...
Like the dog sled, the leg vise got a design change - to make it better and easier to build. Click here for details.
Dimensions:
- 8' x 2' x 4 1/4" top
- Height - 33 1/2"
- 5 3/8" x 4 1/2" legs
- 5 1/2" x 3" stretchers
Material - Douglas fir dimensional lumber
Hardware - see above plus whatever was in current inventory or locally available.
For the split top, boards were rough cut, thickness was planed to exact size so that the glue ups would yield the required width for each of the 2 slabs. Thin strips were cut based on wagon vise gap requirements to put the dog holes in the center of a 1 1/2" thick board. These strips, along with a 1 1/2" thick board were cut shorter to form the wagon vise gap. Each of the 2 sections were glued up all at once, planed to 4 1/4", then the ends crosscut to clean them up.
Legs were laminated from three 1 1/2" boards and the stretchers from 2 boards. Mortise and tenons were used for all base joints as well as the base to top connection. All required mortises were cut into the leg vise leg prior to glue up of the base end sections. The left and right end leg sections were glued with short upper and lower stretchers. Long stretchers connect the end sections via bed bolts. The top slabs are mortised to sit on leg tenons - four lag bolts through the short upper stretchers into the slabs complete the joint.
The leg vise chop was laminated from 2 doug fir boards with the inside face getting a 1/4" layer of maple. It was planed to get a final width of 3". The wagon chop was made from 2 pieces where the hole was first formed in each half before gluing.
Cavities for the wagon vise hardware were cut and the vise was installed. A 2 1/2" cap was lag bolted onto the end to capture the handwheel end of vise. Dog holes were first plunge routed as deep as my 3/4" bit would go, then finished with an auger bit.
It was mentioned after the bench was complete, I could stand on it :~ pretty sure this bench could support an elephant though...
And since it has a dog sled vise, I suppose a dog leg vise would go with it nicely...
Like the dog sled, the leg vise got a design change - to make it better and easier to build. Click here for details.
After using this bench on a few projects, I can't imagine requiring more versatility and power to hold a work piece. The concept of marrying very old bench designs with newer technologies can produce a dream woodworking bench that is pretty simple to build, will last a few lifetimes, and can easily be moved around as shops are upsized, and sometimes even downsized.
Working on it, I thought of ways to improve my original designs. These ideas went into new versions of both vises - the improvements retain the necessary characteristics of quality vises, but made them easier to build.
Working on it, I thought of ways to improve my original designs. These ideas went into new versions of both vises - the improvements retain the necessary characteristics of quality vises, but made them easier to build.
Plans are available.
I am offering 3 sets of plans (they are also packaged together at a discount):
Click here for my roubo bench home page.
Click here for the purchase page.
- roubo bench with cabinet and deadman
- dogsled (wagon) vise plans available now
- dogleg (leg) vise
Click here for my roubo bench home page.
Click here for the purchase page.


